Form 2 Files Sent to Printer Arent Uploading
- Wide format printing
- Costs
- How to guides
- Locations
Printing, scanning and copying are easy at UWA as all libraries and general purpose estimator labs offer the same type of multifunction printer (MFP). The MFP does it all – print, scan or copy, in color and a range of sizes – and you but tap your Campus Card to begin. Details on costs and instructions are on this page, and our friendly Library staff can assist y'all if you lot run into any difficulties.
Printing
The certificate sent to be printed, the print task, is held for 12 hours in the impress queue to be printed at whatever Library MFP using a campus card. There are 2 steps in printing your document:
- sending your job to the print queue
- using the Library print stations.
- Stride one - Sending your print job
-
Pick 1 – Using a Library calculator to send the print task
- Log into any Library computer using your Pheme credentials.
- Open the certificate and print to the global print queue or select Albany if you're on the Albany campus.
- If your certificate is more one page it will be printed double-sided and in colour for pages only with colour content. To modify these settings:
- If you wish to impress unmarried-sided select Preferences or Properties > Finishing and untick Print on both sides.
- If you lot wish to impress in black and white only (mono) select Preferences or Properties > Color and tick Print in Greyscale.
- A file sent to the impress queue volition be held for 12 hours and can be printed from any Library MFP on your selected campus.
Tips
- If you are a fellow member of the public without a Pheme account or campus menu, go to a Library information desk to infringe a invitee transaction card. Frequent visitors can purchase a printing transaction card from an autoloader.
- If you log into a Library computer as All other patrons you tin can impress to the global queue, but you will be prompted for your Pheme details OR the guest campus menu username and the countersign 'PRINT'.
- If the global print queue has failed to load, log out and log back into the computer.
- Documents that are large or take images and algorithms tin can fail to print. Read the certificate press guidelines on this folio to ensure your certificate prints.
- If printing in colour, but pages which contain color content volition exist charged at the colour price
Option 2 - Using your own device to send the print task (Web Print)
- Connect your device to Unifi.
- Scan to: impress.uwa.edu.au.
- Log in with your Pheme credentials OR the invitee transaction menu username and the password 'PRINT'.
- Select Web Print on the left hand side and follow the prompts to select your location and printer queue, number of copies and to upload your certificate.
- If you're having difficulty delight follow our Web Print guide.
Tips
- Before you web print, your certificate must be saved equally a permitted file type so you tin upload it.
- Step 2 - Using the print stations
-
Using a Library MFP
- Tag your campus menu on the panel beneath the display, over the words TAG YOUR UWA CAMPUS CARD Hither or log in past entering your Pheme credentials via the touchscreen.
- Select the task(southward) you wish to print and press Print.
- Select Log Out in the top right corner to cease your session or press the Access push button twice.
Tips
- When using an MFP later logging in, yous'll exist presented with whatever print jobs sent to the global print queue. If you lot practice not have any print jobs held in the queue, y'all'll exist prompted to confirm your remainder and presented with scan and copy options.
- If your job isn't displaying when you log in, check you're using the campus carte du jour that corresponds with the computer login.
- Here is a list of all the Library printer, scanner and autoloader locations.
- If your job fails to print, annotation the fourth dimension, document championship, any error messages on the Library Print Station and the condition of the data lite, and study information technology to staff at an information desk.
- To print you volition demand a UWA campus card, or if you lot've forgotten your campus card yous can enter your Pheme credentials via the touchscreen. Members of the public can buy a guest printing carte du jour from an autoloader.
- If you supercede your campus card yous volition not be able to apply the old ane if found again.
- How to print using Web Print
-
To print online follow these steps to submit your job to Web Print. This allows you to print your document from your personal device whilst continued to Unifi.
- Accept your document saved and if you're using your own device connect it to Unifi.
- Browse to: print.uwa.edu.au
- Log in with your Pheme credentials OR the invitee transaction card username and the password "Impress".
- Select Web Impress from the left paw cavalcade.
- Select Submit a Job from the left manus side.
- Select the printer according to your location (Albany Campus ORPerth Metro)and whether y'all want your document printed in black & white/colour and single or double sided. Select 2. Print Options and Account Selection >>.
- Enter the number of copies desired. Select three. Upload Documents >>.
- Select Upload from File navigate to the file(southward) you lot wish to impress and select Open up or drag the file(due south) you wish to upload into the dotted area. Select Upload & Consummate.
- Later a few moments y'all should run into 'Your document was successfully submitted.' and the status of your impress job submission will be shown.
- Follow stride 2 of how to impress to release your impress job at a Library MFP.
Tips
- The page size set in the layout settings of your certificate will determine the paper size used when printing via Web Print. Information technology is recommended to gear up a common page size such as A4 or A3. To print an A3 document, the document page size must be fix as A3.
- Documents that are big or have images and algorithms can fail to print. Y'all can apply the 'How to guides' section on this page.
Scanning
All libraries accept facilities for UWA students and staff to scan to email using an MFP. USB scanners can be used past anybody, merely are only available in:
- Barry J Marshall Library
- Education, Fine Arts and Architecture Library
- Reid Library
- Scanning to electronic mail
-
Yous'll need a UWA Campus Card. Members of the public tin purchase a invitee printing card from an autoloader or borrow one from the Information Desk and send their scan to their personal electronic mail address.
- Tag your campus bill of fare on the panel below the display, over the words TAG YOUR UWA CAMPUS Menu HERE or log in by entering your Pheme credentials via the touchscreen. If you lot have print jobs waiting, select Use Copier. Select OK to confirm your account balance.
- Select Scan from the bill of fare and refer to the post-obit settings:
Setting email destination
To send the scan to your UWA email accost select Me in the address book and Close to accept confirmation of your electronic mail address. To send to a unlike address select Direct Input and enter the e-mail address(es).Selecting file format
PDF compact is the default output file format. To change this, select the File Type option on the bottom of the screen.Scanning of document(south)
Identify the document to be scanned into the autofeeder (on top of unit) or onto the flatbed. If you take a double-sided document (autofeeder only), select the Simplex/Duplex option on the bottom of the screen and select 2-Sided .Unmarried part scanning
Press the Start button on the photocopier to get-go the browse.Multiple part scanning
If you wish to scan multiple pages (flatbed scanning) or parts (autofeeder scanning) into a single file select the Dissever Scan option on the lesser of the screen.Press the Start push on the photocopier to offset the scan and follow the on screen prompts. When y'all have scanned all pages that will make upwardly the file, select Finish and printing the Start button to send.
- Press the ACCESS button and select Yeah to cease your session.
- Scanning to USB
-
- Place loose paper to exist scanned on the certificate feeder on the summit of the USB scanner OR Place other documents to be scanned on the glass flatbed.
- Insert your USB to the USB port on the right hand side of the scanner and select OK .
- Select a folder on the USB to browse to or create a new folder and choose the file blazon. We propose PDF.
- Select More Options to select file type or quality.
- Striking the large green button on the USB scanner to start the scan.
- To add pages to the electric current file:
- Place more than loose newspaper on the document feeder. OR
- Place another documents on the glass flatbed, then press Scan.
- Select Finish once you have scanned all the pages that will brand up the file.
- Do not remove your USB until the data lite (indicated by an hour glass) has stopped flashing.
Tips
- A PDF file is the best file type for scanning texts and books.
- If using the flatbed please ensure all A4 documents are portrait-facing.
- The copier and the USB scanner will default to scanning items in the document feeder.
- When using the document feeder, all pages will be scanned with one select of the green button.
- Scanning to email defaults to the Meaty PDF file type on MFPs.
- Depending on the size of the file it can accept a curt while to get to your UWA email inbox.
- The more pages scanned the more likely to is that the print chore may get corrupted. To protect against abuse, scan in batches. For example, select 'Stop' after every chapter.
Copying
Y'all tin can copy documents using the MFPs in libraries using a UWA campus carte. Members of the public tin can purchase a guest printing card from an autoloader.
- Tag your campus card on the panel below the display, over the words TAG YOUR UWA CAMPUS CARD Here or log in past inbound your Pheme credentials via the touchscreen. If you lot have print jobs waiting, select Utilize Copier. Select OK to confirm your residue.
- Identify the document into the autofeeder (on top of unit) or onto the flatbed. If your document is double-sided (autofeeder only), select the Duplex/Combine option on the bottom of the screen to select options.
- Printing the Kickoff push button on the photocopier to start the copy.
- Press Access and select Yes to stop your session.
If using the flatbed, ensure all A4 documents are in portrait orientation.
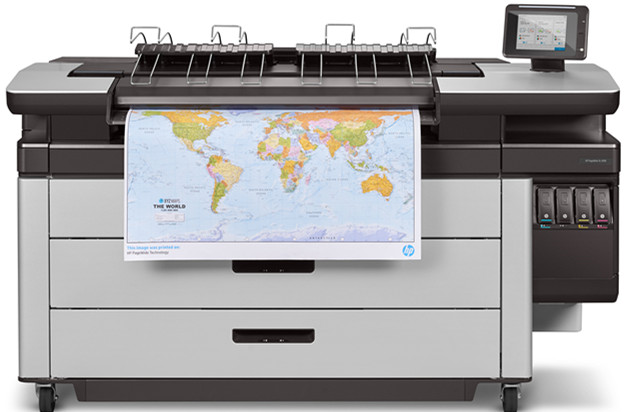
Wide format printing
Wide format printers (WFP) are available in Reid and Barry J Marshall Libraries. These printers can print out loftier-quality prints on paper over 800mm wide and of almost whatever length.
The devices too perform colour scanning at no accuse, and so if you have scanning needs the standard printers tin can't cater for, these big format devices are ideal.
- Printing
-
- Within the print dialog box select the local wide format printer from the printer driblet down list:
- Reid-wide-format (Level 1 West, Reid Library)
- BJM-wide-format (Level ane Northward East, Barry J Marshall Library)
- Printing is colour past default. To print in black and white, or to modify any other settings such equally newspaper size (upwardly to A0 size), select Properties in the print dialog box.
- Select Print.
- Your print chore will be sent and printed immediately. Ensure you collect your job as soon as possible.
Note: printing is merely available from Library PCs in the aforementioned location as a wide format printer.
- Within the print dialog box select the local wide format printer from the printer driblet down list:
- Scanning
-
- Using the touchscreen of the printer, select Scan. If the screen is bare press the power button to the right of the screen.
- On the Scan Destination folio select Email; or if saving to a USB device, select USB drive post-obit on-screen instructions to insert your device. Refer to the following settings:
Setting e-mail destination
On the Scan to email page select the Transport to: field and enter the email accost. If desired enter a Subject and Message. Select OK.Selecting salvage folder (USB)
Select folder on the USB device to scan to or create a new folder. Notation: the printer simply accepts pollex drives that are formatted in FAT32 or NTFS formats.Setting print quality
On the Scan configuration page select the appropriate print quality contour which matches the document yous wish to scan. You can accommodate resolution and color settings inside a contour past selecting the bluish pencil icon on the top correct of the profile.Setting file format and multiple part options
Select your file format type (.jpg, .pdf or .tiff) . We recommend .pdf for most documents due to the smaller size and ease of access on multiple devices. Note: selecting .tiff format volition produce large file sizes which may exceed the maximum e-mail attachment size allowable for delivery. If the maximum is exceeded there will be no alert and the email volition fail to be delivered.Select Separate single-folio files to browse multiple parts each as a separate file OR select One multi-folio file to scan multiple parts into a single file.
- Insert the document you wish to browse, confront up and centred into the feeder.
- Select Scan.
Once the certificate has been scanned by the feeder, select the Squirt icon on the top-correct of the screen to remove the certificate. If yous are scanning to a USB thumb drive you can and then remove the device.
Costs
You will need to have value on a Campus Card to print or copy using MFPs. You lot can add value via autoloaders or online.
There is no charge for scanning documents.
Add value to a Campus Carte – autoloader
Autoloaders are recharge machines you utilize to add together credit to your Campus Card for printing and photocopying services. All UWA autoloaders take EFTPOS and credit cards, and selected autoloaders also accept gold coins.
To add print value, tag your Campus Carte on the autoloader and follow the on-screen prompts.
Add together value to a Campus Card – online
You can only utilize a credit card to add print value online.
- Go to campuscard.uwa.edu.au.
- From the left-mitt side select Online Account.
- Log in using your Pheme credentials.
- Ensure pop-ups are not blocked.
- From the left-mitt side select Add Value to My Business relationship.
- Follow the prompts.
Tips
- Autoloaders do not give alter!
- Members of the public can purchase a guest Campus Bill of fare from an autoloader.
- If you've forgotten your Campus Card or practise not wish to purchase one, go to an information desk to borrow one.
MFP costs
Cost per copy/impress on multifunction printers:
- 5¢ per mono A4 side
- ten¢ per colour A4 side
- 10¢ per mono A3 side
- xx¢ per colour A3 side
WFP costs
Toll per print on broad format printers
- $iv per mono square metre
- $8 per color foursquare metre
How to guides
Guides for printing your certificate successfully
The following tips may assist if your certificate fails or takes a long time to print:
- If possible, it is strongly recommended that you convert your documents to an Adobe PDF before printing it. This can avert certain visual elements such as graphs and images not printing correctly.
- Well-nigh importantly, the file size should be under 250MB.
- You should only impress a maximum of 100 pages
- You should simply brand a maximum of 100 copies
- You cannot print straight from Photoshop or Indesign.
- Keep images inside the margins of the document.
- Set upwardly documents to either A4 or A3.
- If you're using epitome editing software, make sure to always flatten layers.
- Make sure your software is up to date to ensure the best compatibility.
- Split files upwards, especially for theses and PowerPoint slides. Remember, press more than one slide to a folio even so requires that each slide be rendered separately. There will be delays when press more than i slide to a page.
- Converting to PDF or XPS
-
PDFs and XPS files are more often than not smaller than other document types and tin be uploaded to Spider web Print.
Windows
Creating an XPS file.
- Open your document and selectFile>Print. This may look different depending on what program you lot're using.
- Select the printer list drib-downwards and select theMicrosoft XPS Document Writer.
- SelectOKto impress.
- Cull a save location and a name for the print file.
Mac OSX
Creating a PDF.
- MacOS natively has a impress to PDF option bachelor, then nearly Mac programs take this integration. Open up your certificate and selectFile>Print. This may expect different depending on what program you're using.
- In the bottom left hand corner of the print box select thePDFdrop-downward and selectSave every bit PDF.
- Choose a name for the file and a save location.
Office 2007 and current versions
Creating a PDF.
- Newer versions of Office permit files such as Word, Excel, Powerpoint and OneNote documents to be saved natively as PDFs. Select File > Relieve Equally.
- From the salvage as blazon drop-downwards select PDF.
- Select OK and Save.
- Reduce file sizes
-
Reducing print document file sizes increases the chance of getting a prompt print-out.
Adobe Reader
For compressing PDFs on Windows.
- Select File > Print
- Choose XPS Document Writer for saving an XPS file. Then select Advanced.
- Check the Impress at Prototype box and select OK.
- Select Print. If you chose to save an XPS file you will now be prompted to proper noun it and cull a salve location.
- Your file is now ready for uploading to Web Impress.
Preview
For compressing PDFs on Mac OSX.
- Select File > Export.
- In the Quartz Filter drop-downward select Reduce File Size.
Select Salve. - Your file is at present set up for uploading to Web Print.
Office 2007 and electric current versions
For compressing Word, Excel and Powerpoint files.
- Select File > Save Equally.
- Choose a new proper name for your file such as "<file name> print version".
- From theSave as type drib-down, selectPDF.
- Cheque the Minimum size box and the Open up file afterwards publishing
- Select Tools and select Compress Pictures...
- Check the Delete cropped areas of pictures box and the E-mail (96 ppi)
- Select OK and Salvage.
- Check the now open print copy and ensure the compression is adequate.
- Your file is now ready for uploading to Web Impress.
- Split files
-
Splitting files reduces the file size and increases the chance of a prompt print-out.
Windows
- In the programme of choice select: File > Print.
- In the Printer drop-down select Microsoft XPS Document Writer.
- Select the Print Custom Range (the name may alter from program to program). Set the range. Yous can set it to print (for example) the first 50 pages, or consider splitting upward the certificate into chapters.
- Select Impress.
- Choose a file proper noun, for example 'My Thesis – Affiliate 1 ' or 'My Research – one-50pp', and select a salve location.
- Repeat until yous have completely split the document for printing.
MacOS
- Open the document you want to divide and select File > Print (yous don't accept to do this step if your document is open in Preview).
- In the lesser left mitt corner select PDF > Open up PDF in Preview.
- In Preview select the second icon from the left above the opened PDF (if you're using a newer version of Preview you'll need to select Thumbnails).
- In Preview select File > Duplicate.
- In the indistinguishable PDF, select the unwanted pages and hit delete. Select the pages by either: Select+Drag over the unwanted pages OR southwardelect the first page and Shift+Select the final folio in the sequence of unwanted pages. Hit
- Choose a championship for the duplicate, such as 'My Thesis – 1-50pp' or 'My Research – Chapter one'.
- Select Save.
- Close the duplicate PDF and repeat the steps until the file is completely split.
Library printer, scanner and autoloader locations
All multifunction printers (MFPs) print and copy in both mono and colour, and can browse to email.
Broad format printers print in both mono and color, and can scan to email and USB.
- Barry J Marshall Library
-
- USB Scanners: one
- Multifunction Printers: 12
- Wide Format Printers: 1
- Autoloaders: one
- Beasley Law Library
-
- Multifunction Printers: 5
- Autoloaders: 1
- EDFAA Library
-
- USB Scanners: ane
- Multifunction Printers: 4
- Autoloaders: i
- J Robin Warren Library
-
- Multifunction Printers: 4
- Autoloaders: i
- Music Library
-
- Multifunction Printers: one
- Autoloaders: 1
- Reid Library building
-
Ground Floor
- Multifunction Printers: 6 (1 wheelchair attainable)
- Autoloaders: ane
First Floor
- USB Scanners: 1
- Multifunction Printers: 4
- Broad Format Printers: 1
- Autoloaders: i
Second Floor
- Multifunction Printers: 1 (in Postgraduate Area)
Tertiary Floor
- Multifunction Printers: 2
News
Stay in impact
Contact us to receive help and support from our friendly, knowledgeable staff. You can besides share your feedback or brand a suggestion and follow the UWA Library on social media to receive helpful tips and up-to-appointment information about our services.
Source: https://www.uwa.edu.au/library/Help-and-support/IT-and-printing-support/Printing-copying-and-scanning-in-the-Library
0 Response to "Form 2 Files Sent to Printer Arent Uploading"
Post a Comment